Let's Implement a Video Server with node.js and Ffmpeg
Node.js utilizes an event-driven and non-blocking I/O model, which enables it to efficiently handle a large number of I/O requests and concurrent connections. This is crucial for a streaming media server. Meanwhile, ffmpeg provides powerful functionality for video processing. We can leverage Node.js's powerful extension capabilities to integrate ffmpeg and create a video streaming media server.
Node.js adopts an event-driven and non-blocking I/O model, allowing it to efficiently handle a large number of I/O requests and concurrent connections, which is crucial for a streaming media server. Meanwhile, FFmpeg, as a powerful video processing tool, provides rich video processing capabilities.
Combining Node.js's powerful extension capabilities, we can easily integrate FFmpeg to create a feature-complete video streaming media server, meeting various streaming media application requirements.
Now let's start from scratch and implement a simple video server: implementing the functionality to upload and play videos. In the process of learning, we will gradually understand how the video server works.
Before we begin, you need to:
- Understand the basic API of Node.js, such as the fs module, process module, etc.
- Understand the usage and common APIs of Express.js.
- Install and understand the basic usage of FFMPEG.
Now we want to implement a streaming media server. There are many streaming media protocols and formats on the market (RTP/RTCP/RTSP/RTMP/MMS/HLS, etc.), each with different applications. However, the vast majority of websites currently use HLS/M3U8 format streaming media, which is also supported by modern browsers.
Therefore, this article does not elaborate on these streaming media protocols but implements a simple HLS/M3U8 format streaming media server.
The streaming media server implemented in this article is not technically difficult.
MP4 Video Slicing
Open some mainstream video websites, switch to the "Network" tab in Chrome Devtools, and then play the video. You can see that the browser is constantly downloading small files from a URL. These small files are video segments.
In general, web videos do not directly download the entire video file because a video file is usually several gigabytes, and downloading the entire file would be too large. Instead, the videos are split into many small segments, which are then continuously transferred to the browser. The browser then sequentially plays these segments.
For HLS/M3U8 type streaming media, the video playback address is the address for downloading the m3u8 file. The m3u8 file is a text-based list that stores the names, addresses, and order of video segments. Therefore, when playing this type of streaming media in the browser:
We can directly use ffmpeg to slice the video. Run the command in the terminal.
ffmpeg -i input_video.mp4 \
-c:v libx264 \
-c:a aac \
-hls_time 10 \
-hls_segment_type mpegts \
-hls_list_size 0 \
-f hls \
-max_muxing_queue_size 1024 \
output.m3u8
In this command:
-i input_video.mp4specifies the input video file.-c:v libx264 -c:a aacspecifies the video and audio codecs.-hls_time 10specifies the duration of each M3U8 segment, in seconds. Here, the duration of each segment is set to 10 seconds.-hls_segment_type mpegtsspecifies the type of M3U8 segment as MPEG-TS.-hls_list_size 0sets the maximum number of segments included in the M3U8 file. Here, it is set to 0, indicating no limit.-f hlsspecifies the output format as HLS.-max_muxing_queue_size 1024sets the maximum multiplexing queue size to ensure that the output does not exceed the specified size.- The final output file is
output.m3u8.
Of course, there are more advanced uses of the ffmpeg slicing command, such as limiting the size of all segments to not exceed 500kb, etc.
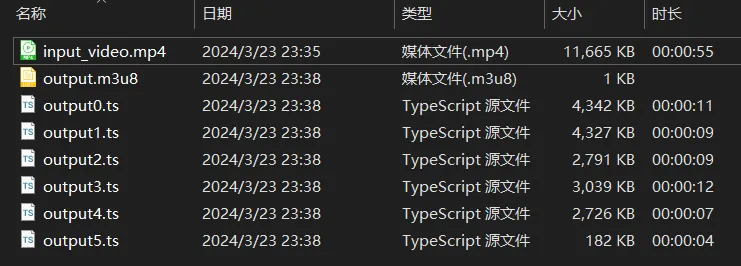
We open the m3u8 list file, which shows the order and duration of each segment as follows.
#EXTM3U
#EXT-X-VERSION:3
#EXT-X-TARGETDURATION:11
#EXT-X-MEDIA-SEQUENCE:0
#EXTINF:11.386378,
output0.ts
#EXTINF:11.011000,
output1.ts
#EXTINF:9.050711,
output2.ts
#EXTINF:8.591911,
output3.ts
#EXTINF:6.506933,
output4.ts
#EXT-X-ENDLIST
Frontend Playback
After the browser gets the m3u8 file, it sequentially traverses this list and then loads the segments listed in the list in order, i.e., output0.ts → output1.ts ... → output4.ts. Since it loads and plays the video while downloading, it immediately starts playing the first segment after loading the first segment and then simultaneously loads the second segment, and so on.
Next, let's create a new HTML file in the same directory and use video.js to play the m3u8 list we just generated.
<html>
  <head>
    <title>Play the video</title>
    <link href="https://vjs.zencdn.net/8.10.0/video-js.css" rel="stylesheet" />
  </head>
  <body>
    <video class="video-js" controls preload="auto" width="640" height="264">
      <source src="./output.m3u8" type="application/x-mpegURL" />
    </video>
    <script src="https://vjs.zencdn.net/8.10.0/video.min.js"></script>
  </body>
</html>
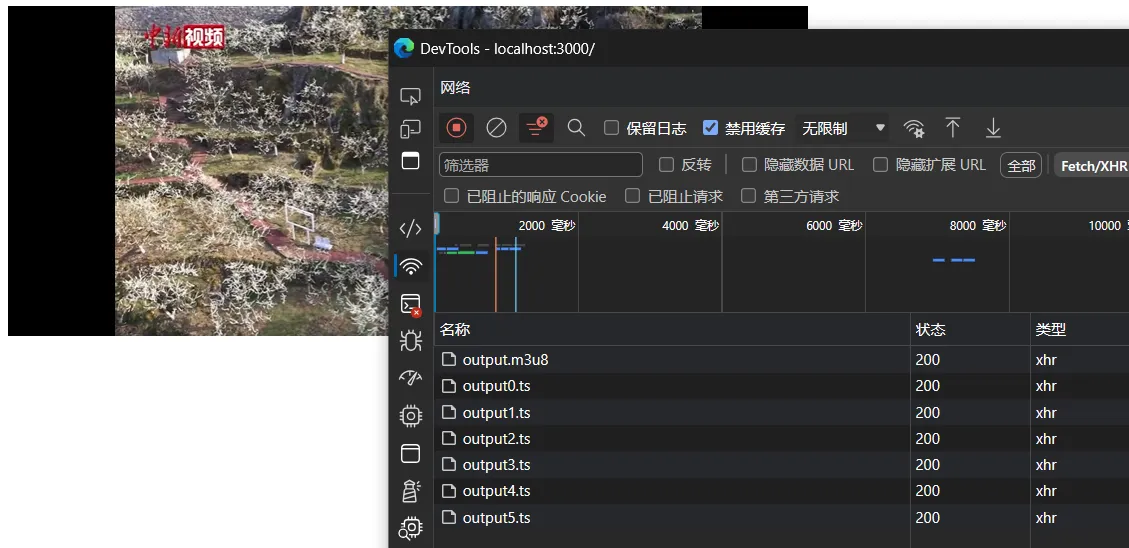
As you can see, the browser successfully loads and plays the segments listed in the list.
So far, the process of slicing and playing streaming media is roughly understood. Therefore, it is not difficult for us to implement the basic functionality of a streaming media server.
Design API
Before we start, we need to design the upload and play APIs.
- Video upload:
/upload, POST request, accepts a file in themultipart/form-dataform. - Video playback:
/play/{videoId}/video.m3u8, GET request, returns a text data of type m3u8. WherevideoIdis the unique identifier for each video.
Implement Upload Functionality
Now we will implement the video upload functionality for the server. Video uploading involves three stages: receiving the uploaded file → video slicing → video persistent storage. After uploading, return a video playback address to the client for video playback.
Front-end video uploading is generally done through form files. After the server receives the file, it slices the file and stores it in the public area, then returns the generated m3u8 file address.
First, initialize the node project and install the following packages: express is the server framework for Node.js, multer is a form file processing middleware developed for Express, nanoid generates a unique identifier for the uploaded resource, fluent-ffmpeg is one of the ffmpeg extensions set for Node.js, serve allows you to set up a
server access environment in the local directory.
npm i multer express nanoid fluent-ffmpeg cors
npm i serve --save-dev
Add the following fields to package.json:
{
  "main": "main.js",
  "type": "module"
}
Then create the main.js file and write the following code to create a server:
import express from "express";
import fs from "fs";
import multer from "multer";
import { nanoid } from "nanoid";
import ffmpeg from "fluent-ffmpeg";
import path from "path";
import cors from "cors";

const server = express();
server.listen(3300);
console.log("Server started.");
server.use(cors()); // For easy debugging, allow cross-origin
According to the designed API, add a POST route to upload videos:
const copeUpload = multer({
  dest: "uploads-temp/",
  filename: function (req, file, cb) {
    const uniqueSuffix = nanoid();
    cb(null, file.fieldname + "-" + uniqueSuffix);
  },
}).single("video");

server.post("/upload", copeUpload, function (req, res, next) {
  const tempFilePath = path.resolve(req.file.path);
  const videoId = nanoid();
  const storageDirectory = path.resolve("storage", videoId);
  fs.mkdirSync(storageDirectory);

  ffmpeg(tempFilePath)
    .videoCodec("libx264")
    .audioCodec("aac")
    .addOption("-hls_time", 10)
    .addOption("-hls_segment_type", "mpegts")
    .addOption("-hls_list_size", 0)
    .format("hls")
    .addOption("-max_muxing_queue_size", 1024)
    .output(`${storageDirectory}/video.m3u8`)
    .on("start", function () {
      console.log("Starting video slice process.");
    })
    .on("end", function () {
      fs.rmSync(tempFilePath); // Delete the uploaded temporary file
      console.log("OK");
    })
    .on("error", function (err) {
      fs.rmSync(tempFilePath); // Delete the uploaded temporary file
      console.error("Error:", err);
    })
    .run();

  res.json(`http://localhost:3300/play/${videoId}/video.m3u8`); // Return the playback address
});
Implement Playback Functionality
Next is to set up the playback API for the server.
After uploading the video, the server will return a playback address to the client, which is the download address of the m3u8 file. So this part is very simple.
When the player requests the video address play/abcde/video.m3u8 with the ID abcde, since the m3u8 specifies that the slice file and the m3u8 file are in the same directory, the address for requesting the slice is also
play/abcde/output01.ts
play/abcde/output02.ts
play/abcde/output03.ts
......
So what the server actually needs to do is to retrieve the files requested by /play/${videoId}/* from the storage directory and return them to the client.
server.get("/play/:videoId/:filename", (req, res) => {
  const videoId = req.params["videoId"];
  const storageDirectory = path.resolve("storage", videoId);
  if (!existsSync(storageDirectory)) {
    res.status(404).send();
  }
  const filename = req.params["filename"];
  const filepath = path.join(storageDirectory, filename);
  if (!existsSync(filepath)) {
    res.status(404).send();
  }
  const data = fs.readFileSync(filepath);
  res.send(data);
});
Functional Testing
In the above process, our video server is completed in less than 100 lines of code. Next, we will write code for the client to test the upload and playback functions of the server.
Requirements: After uploading the video, return the video playback address and play the specified video address.
Create an index.html in the same directory:
<html>
  <head>
    <title>Video Server</title>
    <link href="https://vjs.zencdn.net/8.10.0/video-js.css" rel="stylesheet" />
  </head>
  <body>
    <div>
      <h2>Upload Video Files</h2>
      <form id="uploadForm" method="POST" enctype="multipart/form-data">
        <input type="file" name="video" accept="video/*" />
        <button type="submit">Upload</button>
      </form>
      <div id="response"></div>
      <script>
        const form = document.getElementById("uploadForm");
        form.addEventListener("submit", function (event) {
          event.preventDefault();
          const formData = new FormData(form);
          fetch("http://localhost:3300/upload", {
            method: "POST",
            body: formData,
          })
            .then((response) => response.text())
            .then((data) => {
              document.getElementById("response").innerText = "Upload successful, video address is: " + data;
            })
            .catch((error) => {
              console.error("Request error:", error);
            });
        });
      </script>
    </div>

    <hr />

    <div>
      <h2>Play Video</h2>
      <label for="m3u8-url">Enter the m3u8 address of the video:</label>
      <input type="text" id="m3u8-url" name="m3u8-url" placeholder="For example: https://example.com/video.m3u8" />
      <button onclick="playVideo()">Play</button>

      <video id="my-video" class="video-js" controls preload="auto" width="640" height="360" data-setup="{}">
        <source src="" type="application/x-mpegURL" />
      </video>
      <script src="https://vjs.zencdn.net/8.10.0/video.min.js"></script>
      <script>
        function playVideo() {
          var m3u8Url = document.getElementById("m3u8-url").value;
          var videoPlayer = videojs("my-video");
          videoPlayer.src({
            src: m3u8Url,
            type: "application/x-mpegURL",
          });
          videoPlayer.play();
        }
      </script>
    </div>
  </body>
</html>
Then start the server:
node main.js
The server is running at http://localhost:3300.
Then start the user interface:
npx serve
You can access it in the browser at http://localhost:3000.
Test results are as follows:

Conclusion
In this article, we implemented a simple streaming media server and successfully implemented two core functions: video upload and video playback.
Of course, this project is just a demo. It is far from enough for
a video server used in a production environment to have only these two functions. It also requires other more powerful functions such as video resource management, resource health monitoring, network fluctuation monitoring, encryption, and security, etc. I won't go into details about these. If you are interested, you can implement them yourself.
Download Source Code
The source code repository for this project is here on GitHub. It's released under the CC 1.0 open-source license.